| This tutorial shows how to take drab line art you sometimes get in a
clipart collection and really spice it up. |
| Open any lineart/clipart, and increase the colors to 16 million (24
bit). Colors/Increase color depth/16 million. |
 |
 |
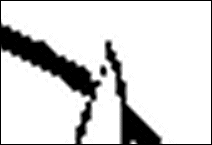
We will use the magic wand tool to select the areas that we want to
color. But before that we have to fix any non-connected lines on the image. So just zoom
in on the image and extend any broken with the paint brush tool. lines in the image. |
| Now use the magic wand tool to select the area. Flood fill it with your
favorite color. You can experiment here with fill styles, textures, filters... anything
you want. When you are done go to the next area. You can even select the black outline to
change it's color too. |
 |
 |
Keep filling areas until you have your finished image. |
| You may need to adjust the tolerance on the magic
wand tool in order to have it select just the area you want. The lower the tolerance the
more selective the tool will be. Remember sometimes lineart/clipart will have an antialias
effect, so you my think you have a solid black line but when you zoom in you will see
there is a fine feathering of grays. If the tolerance is high you may be able to pick up
the feathering and give you a sharper edge. If not I just use the eyedropper tool to pick
up color around the edge I want to blend then use the paint brush tool to fix it pixel by
pixel. |
 |
Here I used a combination of Blade
Pro (plugin filter) and a linear gradient flood fill. |
|