| Open a new 300x100 image. Choose Image/Noise/Add and set Noise=90,
Random. |
 |
 |
Choose Colors/Grey Scale, then Colors/Increase Color Depth/16 Million
Colors. |
| Choose Image/Deformations/Motion Blur and set Direction=135 degrees and
Intensity=15. |
 |
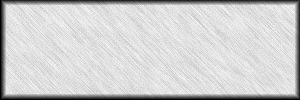 |
Set the background color to white. Choose Image/Effects/Buttonize and
set Edge Size=6 and select Transparent. |
| Open a new image of the same size, but make the background Transparent.
This image will be the holes for your screws. Choose the selection tool and make a
circular selection 60x60. (The first set of numbers show you the beginning point, the
second set show the ending point, and the third set of numbers show you the dimensions of
your selection.) Set the foreground color to a dark grey (background=white). Select the
Flood Fill tool and set Match Mode=None, Tolerance=0, Fill Style=Linear Gradient,
Options/direction=135 degrees. Repeat these steps to make another circle as shown below. |
 |
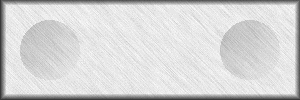 |
Copy this image and paste it as a new layer over the steel plate image.
Adjust the opacity of this layer until it looks like circular indentations.
(opacity=~25-30). |
| To make the screws open a new image 50x50 background=transparent.
Select the selection tool set to Circle, Feather=0. Select a circular area that's 25x25.
Set foreground=white background=black. Select the Flood Fill tool and set Fill
Styl=Sunburst Gradient, Options; Origin: Vertical=70, Horizontal=30. |
 |
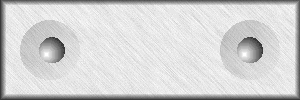 |
Copy your image and paste it as a new selection. Position it over the
indentations on your plate. Do this for both indentations. |
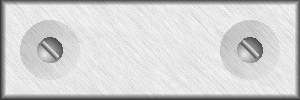
| To make the slits in the screws open another image 50x50
background=transparent. Select the selection tool and set Type=Rectangle. Draw a 22x5
rectangular selection. Set foreground=black, background=white. Select the Flood Fill tool
set to Fill Style=Linear Gradient, Options; Direction=0 degrees. |
 |
| Choose Image/Rotate, set Free and 135 degrees. |
 |
| Copy this image and Paste as New Selection on your plate. Position the
screw slit over one of the screws. Repeat this for the other screw. |
 |
 |
You can now add text or a design or logo. I added text and applied a
cut-out to it...experiment! |
This tutorial came from T. Michael Clark & GrafX Design.
|