Basics on Selections
A Selection: is a temporary isolation of an area in an image. By making selections
you can limit effects the selected area.
- Coordinate Numbers Interpreted: The most important tool you can use when making
selections is the coordinates in the lower left corner of the status bar. This will help
you make proper sized proportions and give you a sense of orientation within your image.
- The coordinates are displayed in the format: (n1,n2) -> (n3,n4) = (n5,n6)[n7].
- This stands for (x=left, y=top) -> (x=right, y=bottom) = (width, height)[aspect
ratio].

- Selection Modes:
- Standard vs. Floating:
- The standard selection is actually part of the image, if it is edited, the original
image will be changed.
- The floating selection hovers above the image, editing it will not change the original.
- If you have the layers pallet open when you are making a floating selection, you can see
a button labeled Floating Selection.
- PSP Selection Tools:
 Selection tool:
selects a precise shape
 Freehand tool: selects
irregular shapes
 Magic wand tool:selects
a range of colors, hues, and lghtness
Magic wand tool:selects
a range of colors, hues, and lghtness- cut & paste selects the entire or portion of an image and saves it in the
clipboard, then paste as transparent or paste as new selection.
Tool Options:
When you use one of the selection tools you will have several options in the dialog box.
These options are ways that you can modify the selection to achieve a desired effect.
- Moving/Repositioning the Marquee: Before you can move the marquee you must select
the
 mover tool after you make
your selection. Hold the Right mouse button down on the selection and move it to a new
area. This deselect the previous area and reselects the new area in the same dimensions.
- Saving a Selection:
- *.sel Files: saves the selection as a separate file on your hard drive
that you can use again to select the same shape and size on another image. When you want
to save it you choose: Selections/Save to Disk. When you want to retrieve it you
choose: Selections/Load from Disk.
- Alpha Chanenls: saves a grayscaled bitmap within the image. This contains
information about the color elements. When you want to save it you choose: Selections/Save
to Alpha Channel. When you want to retrieve it you choose: Selections/Load from
Alpha Channel.
Editing Selections:
- Invert: selection changes the marquee so that it selects the opposite of what was
initially selected.
- Expand: enlarges the entire size of the selection
- Contract: decreases the entire size of the selection
- Float: selection temporarily sits above an image layer and can be moved or
modified without changing the original image. Defloat it to paste it into the image layer
again.(Note: Selecting a vector object and floating it makes
it become a raster selection and can not be changed back to a vector object.)
- Grow Selection: expands the selection to inclued areas of similar color adjacent
to the selected colors, using the magic wand tolerance settings.
- Select Similar: expands the selection to include areas of similar color using the
magic wand tolerance settings. The areas do not have to be adjacent to the selected
colors.
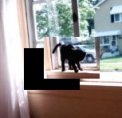
- Removing White/Black Matte: When you cut and paste a selection that is
antialiased or feathered, to a colored background the edge still has some black or white
(selection must be floating). This function will remove these black or white edges. See samples.
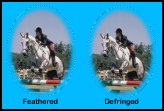
- Defringe: moves pixels in the image out and over jagged edges of feathered
selections for a smoother edge on colored backgrounds (not black/white).(click image for
enlarged copy)

The image will open in a new browser window.
Close the new browser window when you are done.
- Subtracting from a selection: Create a selection and then create another
selection with the CTRL key held down.

- Adding to a selection: Create a selection and then create another selection over
it with the SHIFT key held down.

- Cut: This will remove the selection from the original image and places it in the
clipboard (to be pasted elsewhere later). If you cut a selection from a layer, that cut
section will become transparent.
- Copy: This will place the selection in the clipboard without altering the image.
- Copy Merged: Use this feature to copy all layers of an image with multiple
layers (not just the active layer).
- Paste: This will apply a selection to the image that was saved in the clipboard.
- Paste as new image: will create a new image out of the copied selection.

- Paste as new layer: will create a new layer over the image, using the
copied selection.Can not be larger than the image it is being pasted into.
- Paste as new selection: will create a floating selection above the image,
using the copied selection.

- Paste as transparent selection: This will create a floating selection
above the image, but will use the active background color (in the color palette) as the
choosen transparent color. Areas in the copied selection that contain this color will not
show up.

- Paste into a selection: This will paste the copied selection into a new
selection of an image by resizing the copied selection to fit.

- Dragging a selection:
- Cut and drag: Drag the selection with selection tool and you will leave
behind an open or transparent section in the image. To move it pixel by pixel (nudge),
hold the SHIFT key down and use your arrow keys to move the image.

- Copy and drag: Drag the selection with the selection tool while holding
the ALT key down and you will leave the orginal intact while making a selection copy over
the top.

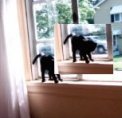
- Convert to seamless pattern: PSP uses the area around the rectangular selection
to blend away seams. It then creates a new image and leaves the original unchanged (to be
used as backgrounds or patterns for the fill tool). See
Samples. The image must be 24-bit color or
gray-scaled.


