Basics on Brushes
Other Brush Types
The Draw Tool
Draw Tool: You can use the
Draw Tool to draw single lines, freehand lines, Bezier curves, and point to point lines.
You can create them as raster objects or vector objects. When drawing lines you have
several options you can choose from Tool Options.
FIRST TAB:
- Type: four types
- single lines (straight lines):
- To draw a single line you can hold your mouse down and drag it in any direction to draw
the line. When you release it will draw the line.
- If you hold the SHIFT key down when you are dragging the mouse you will get lines that
only go at 90 or 45 degree angles.
- Next hold the ALT key and click in several spots. Release the ALT key and click one more
time in any position to end your drawing. You will get a line of angled segments.
- If you want to connect a line that you have already drawn to another segment, just hold
the ALT key down and click on your image and PSP will continue to connect angeled
segments.
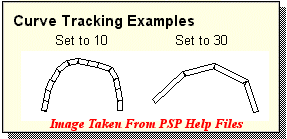
- freehand lines (any shape): You can draw lines in any shape you want. The Curve
Tracking value on the second tab will control the distance between nodes in the line. Use
lower numbers for tighter curves.
- Bezier curves (curved lines): See Samples. This link will open a
new browser window. Close the new browser when you are finished viewing the samples.
- Hold your mouse button down and drag to create a line.
- Click an area away from the line and you will get a node handle at one of the ends of
the line. If you move this node handle you can stretch and curve the line.
- Do this twice (for each end) and edit your curves (clicking twice in the same spot will
create an arc, while clicking once on one side and once on the opposite side will create
an S-curve.). Releasing the mouse after the second click (node) will set the curve.
- point to point lines (lines composed of nodes): This is like connect the dots.
When you draw point to point lines you make Nodes. Nodes are like your corner points. When
you drag your mouse you make curved segment nodes and when you click you make straight
segment nodes. To end the point to point line, right click to get the edit menu and choose
Quit Node Editing or just press CTRL+Q.
- Style: three styles; (Note: these styles are not apparent when you use Single
Lines.
- Stroked: The forground (left click) or background color (right click)is applied
to the color path.
- Filled: The starting and ending points are automatically connected and the
interior is filled with either the forground (left click) or background color (right
click). The connected edges are also colored.
- Stroked & Filled: The starting and ending points are connected and the
interior is filled with the opposite color. The connected edges are not colored.
See Samples.This link will open a new browser window. Close the new browser when
you are finished viewing the samples.
- Width/Size: The thickness of the line can be set from 1 to 255 pixels.
- Antialias: This will blend the edges so that slanted lines appear smoother. This
will only work with 24-bit or gray-scaled images.
Close Path: When this is choosen, the start and ending points
of Freehand lines and Bezier Curves are automatially connected to form a continuous line
(or oddly shaped rings).

- Vector: You can choose to create lines as vector objects. See Basics on File Formats for more information
about vectors.
SECOND TAB:
![]() You can use the
Draw Tool to draw single lines, freehand lines, Bezier curves, and point to point lines.
You can create them as raster objects or vector objects. When drawing lines you have
several options you can choose from Tool Options.
You can use the
Draw Tool to draw single lines, freehand lines, Bezier curves, and point to point lines.
You can create them as raster objects or vector objects. When drawing lines you have
several options you can choose from Tool Options. 

