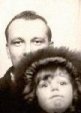
| In this tutorial I will show how to take a black and white photo and add some color to it. I had to grey scale a newer photo because I didn't have an old b&w photo. If you do this make sure you increase the colors to 16 million again. |  |
| In this tutorial I will show how to take a black and white photo and add some color to it. I had to grey scale a newer photo because I didn't have an old b&w photo. If you do this make sure you increase the colors to 16 million again. | |
 |
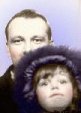
Now in the Layers Palette I promote my background to a layer. Next I added layers and use different tools and effects to add color to my photo. To the original layer (background) I choose COLORS/COLORIZE to give it an antique look by setting the Hue=25 and Saturation=55. I used the lasso tool to select several large areas and the flood fill tool to fill those areas with color. On the cheeks I used the air brush tool with the hardness and opacity set low and sprayed spots on the cheeks. For smaller areas like the lips I just used the paint brush tool, size=1 pixel and painted in the areas. Each different area was colored on its own layer. I just kept adding layers. |
| Finally I adjust the opacity of each layer until I achieve the desired color and blend. Several years ago my mother had some of my old baby photos colorized and they looked similar to this. I am sure the photographer that edited my baby photo used the same methods. |  |
| Here is an old photograph of me and my dad - before and after coloration. |
  |