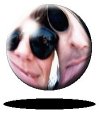
| First open up your 24 bit image (work from a copy so you can keep the
original). |
 |
 |
Apply Image/Deformation/Circle. With the magic wand tool select your
image (or you can Edit/Cut then Edit/Paste as Transparent Image). To get the selection
just right I had to really zoom in and set my tolerance down to about 10. Then I selected
the black background and finally inverted the selection (Selections/Invert). |
| I wanted to add a thin black line around the outer edge. To do this I
made sure my background was black then I choose Selections/ Modify/Expand settings; 1
pixel (Keep your image selected the entire time). Next choose Selections/Invert, choose
white as your background color and hit delete. |
 |
 |
Now choose Image/Effect/Cutout settings; Shadow=white, Opacity=75,
Blur=10, Both Offsets=7 to 10 (depending on the size of your image). Then again, but with
settings; Shadow=black and Both Offsets=-7 to -10 (depending
on the size of your image). |
| The next step is to add a new layer to this image. On this new layer I
added the light refraction. With the airbrush tool settings; Shape=round, Size=10 to 15
(depending on size of image), Opacity=75, Color=white, and make a spray mark about 10:00
(if you think of it as a clock). |
 |
 |
Now apply Image/Blur/Blur More as many times as it takes to soften the
light refraction. |
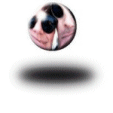
| Next add another new layer and below the image make an ellipse with the
selection tool, then flood fill it with black. |
 |
 |
Again apply Image/Blur/Blur More as many times as it takes to make it
look like a shadow of the image. |
| With a little effort you could make this appear to bounce. Remember
that as the image goes higher the shadow gets larger and more blurred and the lower it
gets the sharper and smaller it gets. You may need to add more frames than I did to get a
smoother bounce. |
 |
|