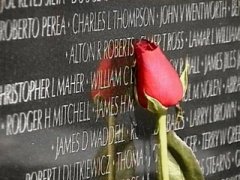
Open your both of your images.
On the reflecting surface, select the area the image is to appear. You can do this with
either the lasso tool, or for a finer cut follow the red
instructions below... |
|
|
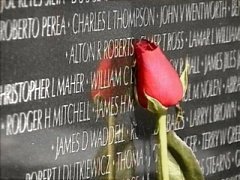
| Pick a foreground color that is very different
from any color in the image. Outline the reflecting surface with a 1 pixel wide line, by
using either the paintbrush tool or the line tool. Then using the Magic Wand tool with
Tolerance=100, Feather=0, select the reflecting surface. Hold down the shift key while you
click in the reflecting area. This adds to the selection as you pick the areas not yet
selected. If the selection escapes, simply click the undo button and reduce the tolerance
until the total selection is inside the colored line, or use the other selection tools
(still holding down the "Shift" button) to add to the selection. Work it until
the entire area inside the colored lines are selected. |
| Once you have your reflective area selected choose
Selections/Modify/Feather=1. Go to Selections/Save to disk (as reflection.sel). Next
choose Colors/Adjust/Brightness and Contrast settings; about 10 (depending on how dark
your images are). Now deselect Selections/Select None. |
 |
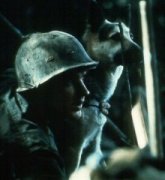
| Now, open the reflected image. Choose Image/Resize and make the height
equal to the height of the original and maintaining the aspect ratio. Go to
Selections/Load from disk and load the reflection.sel into it, this will be used to
cut-out the reflected image. Adjust the selection so what you want reflected is in the
selection. (If you choose the move tool and hold the right mouse button down inside the
selection you can move the selection to the proper position without tearing up your
image.) Now Edit/Copy this selection. Then paste it as a new layer over your other image.
Move it to the proper position. |
 |
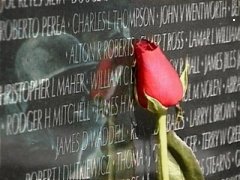
| With the layer control panel adjust the opacity of the new layer until
it looks like a reflection in the original image (opacity=~25-45). |
 |
I got this idea from Sumrall Works Buttonhole. |